Friday, December 25, 2015

Basil pesto...


Today I'm posting a very basic recipe, recipe for a pesto. The word pesto means something made by crushing or pounding. To many pesto is synonymous to basil pesto, but it can be any herb or ingredient.The most common known recipe for basil pesto involves Italian basil, garlic, pine nuts, Parmesan cheese, olive oil and salt. But thousands variations are there. Like I have used walnuts instead of pine nuts, the simple reason being pine nuts are very expensive and also difficult to find where I live. One can replace basil with spinach or coriander or some other green fresh herb. So basically it is a combination of green herb, nuts, olive oil, salt and cheese. Pesto is generally used as sauce for pasta. It can also be used as spread for sandwich, or as pizza sauce or as dip. I do love to have a spoonful of freshly made pesto, just like that.

Traditionally morter and pastle is used to make pesto. I have used a food processor to do the same. The basil I have used is homegrown. It is very easy to grow basil in Indian climate.


Things needed to make Basil Walnut Pesto:

  • Basil: 4 cups
  • Walnut: 1/2 cup
  • Garlic: 2-3 cloves
  • Parmesan cheese: 1/2 cup
  • Extra virgin olive oil: 1/4 cup to 1/2 cup
  • Salt to taste


Steps of making Basil Walnut Pesto:


1. In a food processor add walnut, garlic, cheese and salt, using the pulse mode finely chop all the ingredients. Gradually add the basil and scrape down the sides of the bowl as needed. Blend until a smooth paste is formed.

2. With the blender running add the olive oil. Blend well so the olive oil emulsifies well with the paste. Add less olive oil if you are going to use the pesto for sandwich spread. Add more olive oil if you are going to use it as paste sauce.

3. Taste the pesto, add salt or cheese accordingly.

4. Pesto turns dark and takes a brown color if exposed to air. So immediately transfer to a sterilized glass jar, pour olive oil to cover the top. Close the jar and store in refrigerator for 7-8 days. Pesto can be frozen and store for months. I prefer to make fresh pesto as needed.


If you like to get regular updates from me go to my Facebook page and click on the Like button. You can also follow my blog on NetworkBlogs. Thank you..!!!


Friday, December 4, 2015

Asian style meatballs...


The list of favorite food in my family is quite long. It extends from simple humble alu sedho (mashed potato) bhat (rice) to mutton biryani. Every now and then I get requests to prepare something special for lunch or dinner. The requests mostly come from the little one in my house. I respect my daughter's food preferences and try to introduce her with variety of food. Thankfully she loves to try new food. And whenever I cook up something new or different from the usual she gladly accepts to play the part of the food critic. I find it amusing the way she tastes the first bite from her plate or licks the gravy or chew few little grains of rice. I think she is profoundly influenced by all the judges of cookery shows on TV, specially Masterchef. Fortunately she is a very lenient judge, most of the time I pass with flying colors with a request to make that particular dish again for her. She is the most important reason that motivates me to create something new in my kitchen.


So on a note to impress her while preparing some meatballs to go with the pasta, I thought to give it an Asian twist. Instead of basil, cheese etc I used soy sauce, ginger, garlic to flavor the meatballs and it came out so good and replaced pasta with fried rice. I shallow fried the meatballs. The meatballs can be baked in oven or deep fried, as per choice. I glazed the meatballs with sweet and spicy combination of sriracha, honey and soy sauce. The result was finger licking good.


The ingredients for this recipe are easily available. I used minced chicken to make the meatballs, you can use any other meat of your choice. Depending on one's taste the amount of red chili sauce and honey can be altered. If you like the meatballs to be very spicy add chopped green chilies or red chili flakes to it. These delicious meatballs can be served either as a starter or a side dish.


Things needed to make Asian Style Meatballs:

(Serves 3-4)

For the meatballs:

  • Minced chicken: 300 gm
  • Onion (very finely chopped): 4 tbsp
  • Ginger (grated): 1/2 tsp
  • Garlic (minced): 1 tbsp
  • Sesame oil: 1 tbsp
  • Soy sauce: 1 tbsp
  • Egg: 1
  • Corn starch: 2-3 tbsp
  • Black pepper powder: 1 tsp
  • Salt to taste


For the glaze:

  • Soy sauce: 3 tbsp
  • Sriracha or red chili sauce: 2 tbsp
  • Honey: 2 tbsp
  • Rice wine vinegar: 1 tbsp
  • Ginger (juice): 1/2 tsp [grate the ginger and squeeze the juice out] 
  • Garlic (grated): 2 tsp
  • Black pepper powder: 1/2 tsp
  • Water: 1/2 cup
  • Corn starch: 3-4 tsp
  • Salt to taste

Other ingrdients:

  • Vegetable oil: 3-4 tbsp
  • Sesame seeds and spring onion to garnish


Steps of making Asian Style Meatballs:


1. In a bowl take all the ingredients for meatballs, mix well and make 14 equal size balls. 

2. Heat 3 tbsp oil in a pan, when the oil is hot shallow fry the meatballs till nicely brown from all sides. Take out the meatballs and keep aside.

3. Mix all the ingredients for the glaze in a cup. Taste and adjust salt, honey and chili sauce accordingly.

4. Wipe off excess oil from the pan. Add 1 teaspoon of oil in the pan, when the oil is hot pour the glaze mix and let it boil. As it starts to boil add the meatballs, cook over medium heat and keep coating the meatballs with the glaze.

5. Transfer into a serving plate or bowl, garnish with sesame seeds and chopped green part of the spring onion. Serve hot. Pour the excess glaze in a small bowl and serve it as dipping sauce.


If you like to get regular updates from me go to my Facebook page and click on the Like button. You can also follow my blog on NetworkBlogs. Thank you..!!!


Friday, November 20, 2015

Pan grilled paneer...


Being a non-vegetarian, I always find it difficult to think of a vegetarian starter. But while planning a party one needs to consider the food preference of all the guests and I am sure, we all have friends who are strictly vegetarian. So I thought I would give it a try and prepare a simple quick vegetarian dish that can win everyone's heart.

It's pan grilled paneer. I marinated the paneer cubes with a spicy, tangy and sweet combination. I commonly use the same marination to grill prawns too. For a change I tried it with paneer and it came out really good. I used a cast iron griddle pan to grill the paneer, but you can use any heavy bottom flat pan (tawa). The griddle gives a nice grill marks on the paneer, if you are using a flat pan you won't get the grill marks but it won't affect the taste for sure.

I used sriracha, honey, garlic, lime juice and freshly chopped coriander leaves to marinate the paneer cubes. Sriracha is a red chili sauce available easily in any supermarket. If you don't have sriracha at home, use red chili powder mixed with a little vinegar.


Ingredients for Pan Grilled Paneer:

  • Paneer (cut into rectangles or cubes): 250 gms
  • Toasted sesame seeds for garnish (optional)

For marination:

  • Sriracha sauce: 3 tbsp
  • Honey: 2 tbsp
  • Lime juice: 1 tbsp
  • Garlic (minced): 2 tbsp
  • Fresh coriander (finely chopped): 2 tbsp
  • Extra virgin olive oil: 2 tbsp
  • Salt to taste


Steps of making Pan Grilled Paneer:


1. In a bowl mix all the ingredients for marination, mix well.

2. Cut paneer into rectangles or cubes or any other shape of your choice.

3. Marinate the paneer cubes in the marinade for 15 min to 1 hr.

4. Put the paneer pieces into wooden skewers. The paneer can be cooked without the skewers also.

5. Heat a pan, brush oil on the pan, when the pan is hot place the marinated paneer and cook till the surface takes nice color.

6. Serve immediately with onion rings and lime wedges. Toasted sesame seeds can be used as garnish.

One can try this same recipe with broccoli or tofu.


If you like to get regular updates from me go to my Facebook page and click on the Like button. You can also follow my blog on NetworkBlogs. Thank you..!!!


Saturday, August 15, 2015

Niramish potoler dolma...


Potol or Parwal (pointed gourd) is a common summer vegetable in India. It's a love or hate vegetable. Either you like it or you don't. I fall in the first category. Whether it is fried and served with dal and rice or curried with some potato or prepared with some poppy seed paste(potol posto) I love them all. There are several other way pointed gourd is cooked in a Bengali household. One of the popular preparations is Dolma, stuffed pointed gourd with fish or minced meat. The non vegetarian version is very popular. I remember the day after my marriage ceremony I tasted some awesome fish stuffed pointed gourd, specially prepared for me and my husband. I had a concept that potoler dolma or stuffed pointed gourd can only be made with non-vegetarian stuffing. But I was wrong. The vegetarian version tastes as good as the non-vegetarian one, if not more.

It was a baby shower party of my cousin, their family has a custom of preparing everything vegetarian for  this occasion. There were several delicious dishes, but for me the stuffed pointed gourd was the show stopper. So this time I tried to recreate that in my kitchen. I do not know the exact recipe, I relied on my memory of what I ate that day and prepared this niramish potoler dolma. And it came out finger licking good.

The dish a bit complicated and time consuming, as one need to scrape the pointed gourd, prepare the stuffing, stuff it, fry it and dunk it in the gravy. The recipe involves several steps, but the end result is so good that I'm sure you won't mind. First of all try find out some extra large pointed gourd, that will make easier to scrape the core. To scrape the inside of the pointed gourd cut only a small part from each ends and with the back of a spoon scrape out the soft core of the vegetable only from one side, keep the other side sealed. Do not throw away the scraping, I added it to the coconut and poppy seed stuffing I made . But if you find the seeds are too hard then discard it.


As I mentioned, I made a coconut and poppy seed stuffing for this dish, I also added the scraping of the pointed gourd in my stuffing, blended well with some salt, sugar and green chilies. Make sure the stuffing is not watery. While making the paste in a food processor or grinder add as little water as possible. And also make sure not to over stuff the pointed gourds, or else the stuffing will come out while frying.


Things needed to make Niramish Potoler Dolma:


  • Potol (pointed gourd): 10-12


For the stuffing:


  • Coconut (freshly grated): 1 cup
  • Poppy seed paste: 1/4 cup
  • Green chilies: 2-3
  • Salt to tatse
  • Sugar: 1 tbsp


For the gravy:


  • Coconut (freshly scraped): 1/4 cup
  • Poppy seed: 3 tbsp
  • Black mustard: 2 tbsp
  • Yogurt: 100 gm
  • Turmeric powder: 1/4 tsp
  • Red chili powder: 1 tsp
  • Sugar: 2 tbsp
  • Kalojire/kalonji/onion seed: 1 tsp
  • Dry red chili: 2-3
  • Salt to taste
  • Mustard oil to cook
  • Green chilies (slit lengthwise to garnish): 2-3


Steps of making Niramish potoler dolma:


1. Wash the pointed gourd(potol) very well. Pat them dry. With the help of knife scrape the outer dark green skin. Do not peel the skin. Cut a small part from each ends. Using back of the spoon scrape out the inner soft core from one side. Keep the other side sealed. Rub little salt to the pointed gourds and keep aside.

2. In a bowl mix little water and yogurt and blend it well till smooth, keep aside. Make a paste of coconut, poppy seed, black mustard, green chilies for the gravy, keep aside.

3. Make a smooth paste of freshly scraped coconut, poppy seed, green chilies, salt and sugar. Make sure the paste is not watery. Add very little water, only few teaspoons while making the paste. Keep

4. Stuff the pointed gourd with the coconut stuffing. Do not over stuff.

5. In a kadhai or deep pan heat mustard oil, fry the stuffed pointed gourd till nicely browned. Keep aside.

6. In a fresh kadhai or pan heat mustard oil, when the oil is hot add onion seeds and dry red chilies. As the seeds splutter add the yogurt, and the paste made for the gravy, cook over low heat for 5-6 min, or till oil separates. Add turmeric powder, red chili powder, salt, sugar, mix well. Add the fried stuffed pointed gourd, add little water, let it boil, cover and cook for 5-6 min. switch off the heat. Transfer it to a serving bowl.

7. Sprinkle mustard oil, garnish with slit green chilies, serve with rice.


If you like to get regular updates from me go to my Facebook page and click on the Like button. You can also follow my blog on NetworkBlogs. Thank you..!!!


Friday, July 24, 2015

Doi ilish...


The sun hiding behind the clouds, thunderstorms, the aroma of rain drenched earth and the pitter patter of raindrops on the window...Monsoon, the relief from the scorching heat of summer is a much awaited season in India. Monsoon is extremely important to people of this subcontinent, it irrigates and sustains the crops, it nourishes the greens around us, fills up the water bodies.

To be very honest, sometimes I do not enjoy rain much. I complain about the puddles of water on the road during daily commute, I get irritated with water logged streets and overdose of rain, but monsoon has it's own charm. And being a foodie I relate everything to food, and Monsoon is no exception. The cooling rain and a lazy afternoon with some crispy pakoras and a cup of hot tea is nothing but bliss.  

The reason I can overlook all the negative sides of this season is a fish, the Hilsa, the fish no Bengali can resist. Hilsa and monsoon are synonymous to me. As mangoes are to summer, hilsa are to monsoon. The silver shiny fish is the king of all. Taste, texture, flavor nothing compares to it. So for this monsoon special event I made a very simple but traditional hilsa recipe, doi ilish,  i.e. hilsa cooked in a yogurt and mustard gravy.

The ingredients are very simple and easily available. Fresher the fish, tastier will be the dish. The recipe calls for black mustard paste. To make black mustard paste, soak the mustard seeds for at least an hour in water and grind with a pinch of salt and green chilies.


Things needed to make Doi Ilish:


  • Hilsa fish cut into steaks: 4-6
  • Yogurt: 100 gm
  • Black mustard paste: 1/4 cup
  • Green chilies: 4-5
  • Kalojire/ onion seed: 1/4 tsp
  • Turmeric powder: 1/4 tsp
  • Salt to taste
  • Mustard oil to cook


Steps of making Doi Ilish:


1. Beat the yogurt with a little water and keep aside.

2. Smear the fish pieces with salt and turmeric powder, let it rest for 15-20 min.

3. In a kadhai or Indian wok, heat mustard oil (3 tablespoon), when the oil is hot, fry the fish for 1 min on each side. Take out from pan and keep aside. Do not overcook,

4. In the same oil add kalojire (onion seed/kalonji), green chilies, as it splatters add the yogurt. Cook over low heat for 4-5 min. Add the mustard paste and the fish pieces, add salt. Cover and cook for 10 min.


This post will be part of the the Monsoon special event  of  Kolkata food bloggers.


If you like to get regular updates from me go to my Facebook page and click on the Like button. You can also follow my blog on NetworkBlogs. Thank you..!!!


Sunday, July 12, 2015

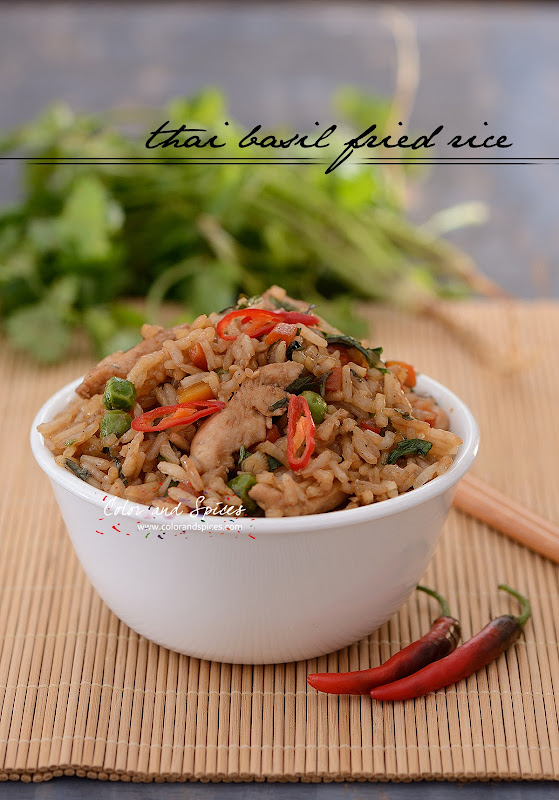
Thai basil fried rice...

thai basil fried rice recipe

I love one pot meals. A balanced dish with lean meat and carbohydrates with a simple crunchy salad perfectly suits my mid-week dinner plan. Last Wednesday I prepared fried rice, but not the usual one. It was Thai style fried rice. (Here you can check my better than take out fried rice recipe.)

When it comes to Thai food, first thing comes to our mind is the explosion of flavour from lemongrass, kaffir lime, thai basil, holy basil, and the strong sharp smell of fish sauce and of course the heat from fresh red chilies.

Saturday, July 4, 2015

Sunehera chicken...


Friday evenings are usually time to relax and unwind for me and my family. The fact that you do not need to set the alarm clocks for next morning is such a relief. I guess it is the same for everyone too.

Unwinding to me is  usually either putting my feet up and getting lost in books or fiddling around in the kitchen to try to put together something special for me and my family. This Friday, it was a chicken curry with some homemade naan bread.

I didn't follow any particular recipe while making this dish, just went along with my instinct. The chicken was marinated for 9 hrs in the refrigerator. The marination I used was a basic one, just onion, garlic, ginger, yogurt mix. To bring in a nice color and flavor I added few strands of saffron.


While marinating the chicken I wasn't really sure about the gravy but wanted something creamy that can go along the naan I was planning to serve it with. My little one really liked the end result- soft and succulent chicken in a lightly sweet  creamy golden curry.

I didn't even think of posting this recipe, but the little one in my house as well as the man insisted that I must post this recipe as it tasted so good. And since this wasn't very planned, I ended up with only a single image for the final dish. Because of the beautiful creamy texture and golden color I named the dish 'Sunehera' chicken, sunehera means golden in Hindi. You can try this at home and let me know whether the name justifies the dish.


Things needed to make Sunehera Chicken:

  • Chicken: 500 gm

For marination:
  • Lime juice: 1 tbsp
  • Salt: 2 tsp
  • Black pepper powder: 1 tsp
  • Yogurt: 1/2 cup
  • Ginger paste: 1 tbsp
  • Garlic paste: 1 tbsp
  • Onion paste: 3 tbsp
  • Kashmiri red chili powder: 1 tsp
  • Saffron: few strands


For gravy:
  • Thinly sliced onion: 2 cups
  • Cinnamon stick: 1 stick
  • Green cardamom: 3-4
  • Dry red chili: 3-4
  • Coriander powder: 2 tsp
  • Red chili powder: 3 tsp
  • Green cardamom powder: 1/2 tsp
  • Cinnamon powder: 1/2 tsp
  • Almond paste: 3 tbsp
  • Poppy paste: 2 tbsp
  • Saffron (soaked in warm water): few strands
  • Salt to taste
  • Honey to taste
  • Oil and ghee to cook


Steps of making Sunehera Chicken:


1. Clean and wash the chicken pieces. I used chicken with bone, can be done with boneless chicken pieces too. Pat dry with kitchen towel. In a bowl mix all the ingredients for marination, marinate the chicken pieces for minimum 2 hrs, better if marinated overnight in the refrigerator.

2. Slice onion as thin as possible, heat oil in a kadhai (Indian wok), when the oil is hot fry the onion slices to brown. Drain excess oil and transfer in a bowl.

3. In a kadhai or pan add ghee, when hot add cinnamon stick, whole green cardamom, dry red chili, cook for 1 min. Add the fried onion. Keep a few to garnish.

4. Shake off the excess marination and add the chicken, cook over high heat for 4-5 min. As the chicken changes color, add the remaining marinade and coriander powder, red chili powder, mix well. Cover and cook over medium flame till oil separates. Add  cardamom powder, cinnamon powder, mix well. If needed add salt.

5. Add a little hot water and let it boil. Reduce the flame to low, add almond paste and poppy seed paste, mix well. Cover and cook for 10 min. Add honey, saffron soaked water, mix well. transfer into a serving bowl, garnish with fried onion and slivered almonds. Serve with some naan or roti.


If you like to get regular updates from me go to my Facebook page and click on the Like button. You can also follow my blog on NetworkBlogs. Thank you..!!!


Saturday, June 27, 2015

Coconut Chutney...


Idli, dosa, uttapam are few items I often make for breakfast and my daughter's lunch box. To accompany the idli, dosa or uttapam my little one makes sure that I make some coconut chutney. Everyone in my family loves this coconut chutney. Easy to make, no cook, a complete hassle free delicacy.

The recipe I follow to make this coconut chutney is passed on from a good friend of my husband. My husband's friend Annu is from Kerala. I have heard so many stories of their college days, how the boys used to devour dosa and chutney from her lunch box and how skillful is A's mom at cooking finger licking food, specially dosa and idlis at home. Once I was making dosa and my husband told me about this recipe to make coconut chutney of her friend's. A e-mailed us the special heirloom recipe, and from then on I'm a big fan of this recipe. It's been more than ten years and I'm still following exactly the same recipe while making coconut chutney. So here it's for you all, a simple coconut chutney to go with dosa or idli. It also works great in between two slices of breads.


It takes hardly 10 minutes to make the chutney, the time consuming part is to scrape the coconut. To reduce the work load frozen grated coconut can be used, but I will recommend of using fresh coconut. To scrape the coconut I used my traditional Bengali coconut scraper (Narkel kuruni). I have grown seeing my mother, aunts using this and me too use this on regularly.

Ingredients for this chutney are very simple and easily available. The curry leaves are home-grown :) In many recipes, specially the restaurant style, chana dal (bengal gram) is added to this chutney, but I prefer without it. The process is also as easy as it could be, put all the ingredients in a grinder and make a smooth paste, and you are done.


Things needed to make Coconut Chutney:


  • Fresh coconut (scraped): 1 cup
  • Onion (diced): 1 tbsp
  • Ginger (chopped): 1 tsp
  • Yogurt: 2 tbsp
  • Curry leaves: 12-14
  • Green chilies: 2-3
  • Salt to taste
  • Water to grind
  • Vegetable oil: 1 tbsp
  • Brown mustard and curry leaves for tempering

Steps of making Coconut Chutney:


1. Take all the ingredients except the brown mustard and curry leaves for tempering, put them in a grinder and make a smooth paste. Pour the chutney in a bowl.

2. In a pan heat oil, when hot add brown mustard and curry leaves, as it splatters switch off heat. Pour the oil and the seeds and the leaves over the chutney. Store chutney in an air tight container in the refrigerator.


If you like to get regular updates from me go to my Facebook page and click on the Like button. You can also follow my blog on NetworkBlogs. Thank you..!!!


Thursday, June 18, 2015

Homemade Flour Tortilla...


I have developed a taste for Mexican food during my four year stay in Texas. I still remember the very first fajita I had and it was love at first bite. Gradually I learnt different Mexican recipes and tried them in my kitchen. Tortilla is an essential part of Mexican food. It is a flat thin and round bread, very similar to our Indian roti or chapati. Tortillas can be made from both corn flour and wheat flour.

Sunday, June 14, 2015

Mango Relish...


I know it seems like ages since I  last posted something on my blog. Our move from US to India  and the whole bit about getting things  back on the groove was one of the reason why I went into this hibernating mode. Thanks to my well wishers and friends who mailed or messaged me to inquire my well being and kept my morale up.