Wednesday, January 30, 2013

Mutton Noorjahani...


Mutton Noorjahani, I'm sure just like me, many of you are not familiar with this name. I came to know about this dish for the very first time was from my culinary expert friend Jhum, when she made Chicken Noorjahani. Somehow never got a chance to make the dish. But when I saw a mouthwatering photograph of that same dish with mutton(goat meat) on my friend ( a well known photographer) Sayntan's Facebook page, I could not resist myself. I decided to cook this dish. It was so awesomely gorgeous I can't even describe. 

I must thank Sayantan for his tempting photograph that forced me to cook this dish and a huge thanks to his better half Rani for the recipe.

The recipe referred about Randhuni seeds. But unfortunately we do not get Randhuni here in the US. I always substitute that with celery seeds, but that's a mere compromise. So I googled about Noorjahani dishes and found the use of aniseed/ anise seed. Aniseed belongs to fennel family and has a very similar aroma. So if you do not get aniseed, you can substitute that with fennel.

Aniseed/anise seed


Here is the way I did my Mutton Noorjahani..

Things needed to make Mutton Noorhajani:


  • Goat meat: 1 kilo/ 2.2 lb
  • Onion (thinly sliced): 1 cup
  • Garlic paste: 1 tbsp
  • Ginger paste: 1 tbsp
  • Yogurt: 1 cup
  • Bay leaves: 3-4
  • Dry red chilies: 5-6
  • Green chilies: 3-4 (depends on the amount of heat you can handle)
  • Cinnamon (1 inch stick): 2-3
  • Green cardamom: 3-4
  • Cloves: 5-6
  • Black cardamom: 2
  • Star anise: 2-3
  • Aniseed: 1 tsp
  • Salt to taste
  • Sugar: 1 tbsp
  • Milk: 1/3 cup
  • Saffron: few strands
  • Oil: 3 tbsp
  • Ghee/ clarified butter: 1 tbsp
  • Grated papaya or meat tenderizer
  • Whole shallots and cherry tomato to garnish (optional)


Steps of making Mutton Noorjahani:


1. Clean and wash the goat meat pieces. Marinate the meat with grated papaya or any other meat tenderizer. Cover and keep aside.

2. Make a paste of green chilies, ginger and garlic, keep aside.

3. Beat the yogurt with sugar and keep aside.

4. Dry roast cinnamon, green cardamom, cloves and aniseed, cool down and ground to powder. Keep aside.

5. Dissolve the saffron strands in warm milk, cover and keep aside.

6. In a heavy bottom pan heat oil. When the oil is hot add bay leaves, star anise, dry red chilies, black cardamom. Cook over medium heat till the spices release a nice aroma.


7. Add the sliced onion and fry to red-brown. Add the goat meat pieces and cook over high heat till the meat pieces take a light brown color.


8. Add the ginger-garlic-green chili paste. Cook over medium heat for 5-6 min. Add salt and mix well. Add beaten yogurt, reduce heat. Cover and cook for 10 min. Stir in between. Add the cinnamon, cardamom, clove, aniseed powder and ghee. Cook for 5-6 min. Add hot water to cover all the meat pieces, cover the pan and cook till the meat is fully done. Stir in between. Check seasoning, adjust accordingly.


9. Add the saffron soaked milk. Mix well. Switch off heat and let it stand for 15 min. Serve hot with rotis or nan bread.


If you like to get regular updates from me go to my Facebook page and click on the Like button. You can also follow my blog on NetworkBlogs. Thank you..!!!


Saturday, January 26, 2013

Rainbow cake...


"Rainbow, rainbow in the sky
Pretty color up so high
Oh, I wish that it would stay
Bringing color everyday..."

I still get excited and happy to see a rainbow after rains as I used to during my childhood. The colors of rainbow in a soap bubble or in the splashing water of a gigantic waterfall or up in the sky....rainbow is always magical.
So when I saw a multi-colored cake with swirling colors, I decided immediately to bake one for my little angel. Thanks to Indrani boudi and Subrata da for the idea and recipe.

The cake is very easy and simple. It is a vanilla flavored yellow cake, that most of us bake at home. I added some color to the batter and layered it to get this rainbow look. Instead of making the cake from scratch you can always use store bought cake mix.  This cake is a very good choice for a kids birthday party. You can also make cupcakes out of it.

I must confess, I do not usually like to use food colors and avoid as much as possible. As this colorful cake is generally made for kids, choose branded food color, preferably organic one.


Things needed to make Rainbow cake:

(Makes a 9 inch round cake, all the measurements are standard US cup and spoon measurements)
  • All purpose flour: 1 and 1/2 cup
  • Granulated sugar: 1 and 1/4 cup
  • Baking powder: 1 tsp
  • Unsalted Butter: 1 stick (110-115 gm)
  • Eggs: 4
  • Milk: 1/3 cup
  • Salt: 1/4 tsp
  • Vanilla extract: 1 tsp
  • Food colors
  • Extra flour to dust
  • Extra butter to grease


Steps of making Rainbow cake:


1. Preheat oven at 375 F.

2. If you are making the cake from scratch then bring all the ingredients to room temperature. I used a hand mixer to make the cake batter. You can use a stand mixer also, whatever available to you. As I said you can use store bought cake mix, in that case follow the instructions on the box.


3. Take unsalted butter and granulated sugar in a large bowl and whisk on high speed till the mixture becomes creamy.


4. Crack the eggs in a small bowl. Add one at a time to the butter-sugar mixture and mix well. Add milk and mix well.


5. Add pure vanilla extract. Try to use vanilla extract, not essence. Mix well.


6. Take flour, baking powder and salt and sieve it into the sugar-butter-egg mixture. Add gradually and fold with a spatula. To fold means to add the flour gradually(not all the flour at a time), and gently mixing it with other ingredients with a spatula or large ladle in a horizontal sweeping motion.


7. When all the flour is completely incorporated with other ingredients, divide the batter into different bowls, depending on the number of colors you are going to add. A bowl for each color.


8. I used 4 colors, red, yellow, green and blue. Mix well and make sure to use separate spoon for each color.


9. Take a 9 inch cake pan grease well with butter. I prefer butter for greasing the can pan, that gives the best result. After greasing the pan, dust the pan with flour. It should be well dusted, or the cake will stuck to the pan.

10. Pour one colored batter at a time to the greased and dusted pan. I started with blue, then green, next yellow and red at the end. Do as you like.


11. Put the cake pan in the preheated oven(middle rack). Bake for 30 min. Insert a toothpick at the center to check.


12. Take out the cake from oven, carefully flip it out of the pan and let it cool down on a cooling rack. After it cools down completely, you can do icing of your choice.


If you like to get regular updates from me go to my Facebook page and click on the Like button. You can also follow my blog on NetworkBlogs. Thank you..!!!


Wednesday, January 16, 2013

Rosbora...The Sankranti celebration continues..


Rosbora is another delicious special sweet made during Poush Parbon. The name tells it, 'Ros' means syrup and 'Bora' means dumplings or nuggets. These are urad dal dumplings soaked in date palm jaggery syrup.

Things needed to make Rosbora:


  • Urad dal: 1 cup
  • Fennel seeds(coarsely ground): 1 tsp
  • Salt a pinch
  • Water: 3 cups
  • Sugar: 2 cups
  • Date palm jaggery: 3/4 cup
  • Oil to deep fry


Steps of making Rosbora:


1. Soak urad dal for 8 hrs or overnight. Wash well, till water runs clear. Make a paste of the urad dal. While making the paste, use water as little as possible.

2. Take the paste in a bowl, add a pinch of salt and the coarsely ground fennel seeds. Now beat the dal very well. If you do not beat it well the dumplings will be hard from inside and the Rosbora will not soak syrup and will not taste good. So BEAT THE PASTE VERY WELL. To know whether you have beaten it to perfection, take a bowl full of water and take a very small amount of the dal paste and drop in the water. If the paste floats then you need not to beat any further, but if it sinks down then you need to beat more.


3. Take a deep pan or kadai, heat enough oil(any vegetable oil) to deep fry. When the oil is hot reduce the heat to low. Add a spoonful of dal paste and add to the oil. Fry 6-8 dumplings at a time, depending on the size of the pan or kadai. Fry over a low-medium flame for 4-5 min. You do not need to fry it till brown like pakoras.


4. Using a slotted spoon take out the fried dumplings and keep them on a paper napkin lined plate.


5. As the dumplings are being fried, in a pan boil water(3 cups) and sugar(2 cups). As the sugar dissolves completely add the date palm jaggery. Keep stirring to mix well. Keep the syrup warm. Add the fried dal dumplings to the hot syrup. The bora/dumplings would tend to float, with a help of a ladle or spoon dip the boras in the syrup. In case you do not get date palm jaggery, increase the amount of sugar, as per your taste.


6. Serve warm.


Click here for Patisapta recipe.

If you like to get regular updates from me go to my Facebook page and click on the Like button. You can also follow my blog on NetworkBlogs. Thank you..!!!


Monday, January 14, 2013

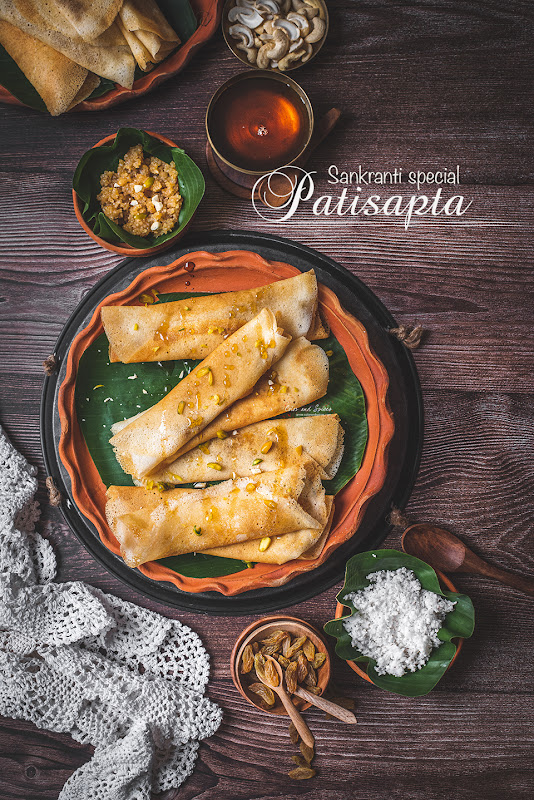
Patisapta...

Patisapta recipe, bengli cuisine, sankranti special

Makar Sankranti is one of the major harvest festivals celebrated in various parts of India. Rice being a staple food for a majority of us Indians, the rice harvesting season is very important, and is a time for celebration. In India, this festival has many names like Makar Shankranti, Bihu, Maghi, Pongal etc depending on the region where it is celebrated.

In West Bengal, Sankranti, also known as Poush Sankranti named after the Bengali month 'Poush' in which it falls, is celebrated as a harvest festival Poush Parbon (on 14 January on the English calendar). Poush sankranti is special because during this time every Bengali household would prepare special sweets called 'Pithemade from rice and date palm jaggery(khejur gur). 

There are various types of Pithe, some are steamed and some are fried. Pithe, can be both sweet or savory. Some need special earthenware to prepare them. The major ingredients are always rice flour, coconut, milk, date palm jaggery. 

Monday, January 7, 2013

Muchmuche alubhaja...the guilt free way


We, bengalis have a special bond with Potato. Be it boiled and mashed(alu sedho) or fried(alu bhaja) or with poppy paste(alu posto). And how can you even think of the Sunday special mutton or chicken curry without potatoes...we love potatoes in our curries and in so many various ways.

Today, I was not in a mood for any elaborate cooking but my taste buds were not in a mood to compromise.  So I made the simplest, easiest and  the quickest meal one can think. It was bhat(steamed rice), lau diye moong dal(lentils with bottle gourd and coriander ) and alu bhaja(crispy fried potato).

My problem was frying the potatoes, I wanted it to be crispy golden brown but was not ready to deep fry the potatoes. Suddenly I remembered about a recipe that I came across through foodieslikeus.com, it called for baked crispy potatoes flavored with garlic and herbs.

I used garlic to flavor the potatoes and the herb I used was fresh coriander leaves. You can use whole dry red chilies or kalonji or panch foron instead of garlic and any other herb that's available to you. Or you can make it plain without garlic or chilies or any herbs.

Here is how I did it.

Steps of making baked crispy potato fries:

  • Russet potato or any baking potato: 300 gm
  • Garlic(minced): 1 tbsp
  • Coriander leaves(chopped): 3-4 tsp
  • Oil: 1-2 tbsp
  • Salt to taste

Steps of making baked crispy potato fries:


1. Wash the potato well. Make sure it is properly cleaned, as we are going to keep the skin.

2. Cut the potatoes into roundels of 1/2 cm thickness.


3. Then cut the roundels lengthwise of 1/2 cm thickness.Try to keep the thickness even while you are cutting, if needed use a food processor or a mandoline slicer. Wash well and dry them with a kitchen towel.


4. I made some garlic oil to flavor the potatoes. In a pan heat oil. You can use any vegetable oil. When the oil is hot add the minced garlic. As the garlic starts changing color, switch off the heat and let it cool down.


5. When the oil is cold enough to handle, strain it through a strainer. The garlic oil is ready. The same way you can use whole dry red chili or panch foron(bengali five spice mix) or kalonji and use that oil to flavor the potatoes. Do not throw away the garlic pieces, keep it aside.


6. Pre heat the oven to 400F/ 200C. Take a baking tray and cover it with aluminium foil. Take the potatoes in the tray and rub well with the flavored oil.


7. Arrange the potatoes in a single layer. Make sure no two potatoes are overlapping. If needed use more than one baking tray.


8. Put the baking tray on the top rack and cook for 10-12 min. Take out the tray and give it a toss. Cook for another 10 min. Cooking time depends on the thickness of the potatoes. Thicker the potatoes, it will need more time to cook. Check in between, if the potatoes look golden brown in color, better switch off the heat and let it stand inside the oven for few minutes and take out the tray. Keep an eye to the potatoes, they tend to burn very easily.

9. Drizzle the potatoes with salt and the reserved garlic and chopped coriander leaves. Serve immediately.


If you like to get regular updates from me go to my Facebook page and click on the Like button. You can also follow my blog on NetworkBlogs. Thank you..!!!


Friday, January 4, 2013

Baked Rosogolla..


Rosogolla is  one of the most popular sweet from Bengal, India. The white soft cheese dumpling soaked in sugar syrup is famous world wide. Now-a-days rosogollas are getting various ingenious makeover from the famous sweet makers of Kolkata, be it chocolate flavored rosogolla, the choco-golla; or rosogollas baked in rich creamy milk, the baked rosogolla.

Lately, I have been hearing so much about the baked rosogolla that I decided to find more information about it and its origin. What I could find was only a mention of the famous sweet maker Balaram Mullick of Bhawanipore, Kolkata who probably prepared it and made it popular.

Since I never tasted it before and there being no authentic recipe available, I decided to experiment and do it my way. A new year party with some of my friends at Austin gave me a good excuse to try my hand at preparing "baked rosogolla". It is mildly sweet and thus makes it acceptable to people who do not like the strong sweetness of rosogolla.

I used canned rosogollas to make this dessert. That makes the job easier. You can also use home made rosogollas, if you have enough time and patience. Canned or home made the baked rosogolla is always a winner. The soft cheese dumplings on a creamy thick milk, baked to give a caramelized flavor is indeed a pleasure for your taste buds.

Things needed to make baked rosogolla:

  • Rosogolla: 20 pieces
  • Whole milk: 1.2 ltr
  • Corn starch: 2 tbsp
  • Sugar: 1/2 cup-3/4 cup
  • Water
  • Saffron: few strands
  • Green cardamom (crushed): 3
  • Pistachio (blanched and chopped): 2 tbsp
  • Almonds (blanched and chopped): 2 tbsp

Steps of making baked rosogolla:


1. Squeeze out all the syrup from the rosogollas.


2. Soak the rosogolla in water for 15 min. Make sure there is enough water to cover all the rosogollas. Squeeze the rosogolla and soak them again in water and repeat. I will suggest to repeat the process twice to keep a little sweetness in the rosogollas. To remove all the sweetness from the rosogollas you need to repeat the process for at least 4 to 5 times.


3. Take 1/4 cup lukewarm milk in a cup and soak the saffron strands on it. Cover and keep aside.

4. Take 1 ltr milk in a heavy bottom pan.  Keep stirring the milk, so it does not stick to the bottom of the pan. Let it reduce to half. Add sugar and crushed green cardamom, mix well. The amount of sugar depends on how sweet you want the dish to be. You can use any commercial sugar substitute instead of sugar. Add the saffron soaked milk and mix.

5. Dissolve the corn starch in some cold milk. Add the corn starch to the reduced milk and keep stirring. It should  have a thick custard-like consistency. Switch off the heat and let it cool down. As it cools down, the milk will thicken further.


6. Preheat the oven to 400F/200C. Take a oven safe bowl and put a layer of the reduced milk. Next arrange the rosogollas. Sprinkle some chopped dry fruits. Add a layer of reduced milk on top.


7. Put the bowl in the oven (top rack) for 15-20 min or till the top layer takes a red-brown color.


8. Let it cool down. Serve cold.


If you like to get regular updates from me go to my Facebook page and click on the Like button. You can also follow my blog on NetworkBlogs. Thank you..!!!